Start Your Free WordPress Journey with Cloudways Cloud Hosting
I know everyone knows, that Cloudways is one of the most powerful managed cloud hosting providers. That offers a click website-making facility for all digital agencies, E-Commerce Stores, or small businesses, with Rebel cost and 24-hour support.
Their all-cloud hosting plan includes powerful features. like; auto hosting scaling, zero downtime, zero-configuration, simple hosting management, and simple domain connecting. Which is a good option for all types of businesses. The most interesting thing is that the platform you will make a WordPress website free, with just a few clicks.
That’s why, in this article, I will discuss this. Because I guess most of people don’t know, Cloudways offer a free hosting credit for all new customers.
The Cloudways free cloud hosting, you will get for a limited time. That means you can use their free cloud hosting for more than 6 months. After ending your free trial period you need to upgrade their premium plan. To get a lifetime free trial, follow my special tips which I include in this article.
So, if you are ready for that and interested to know. How do you get Cloudways hosting free and create a WordPress website? Read the full article carefully.
Start a Free WordPress Website with Cloudways
For getting the Cloudways free cloud hosting to make a WordPress website or blog. First, you need to visit their official website. Create a new account to write your first name, last name, email ID, and password. Select yourself and select your monthly hosting budget. Enter the coupon (SCALE100) in the promo code box, and click I agree to that Cloudways team and condition box. After completing everything click the “free trial” button to finish your new account creation process.
(When you use the coupon code then you will get $100 free credit which help you to gate free cloud hosting)
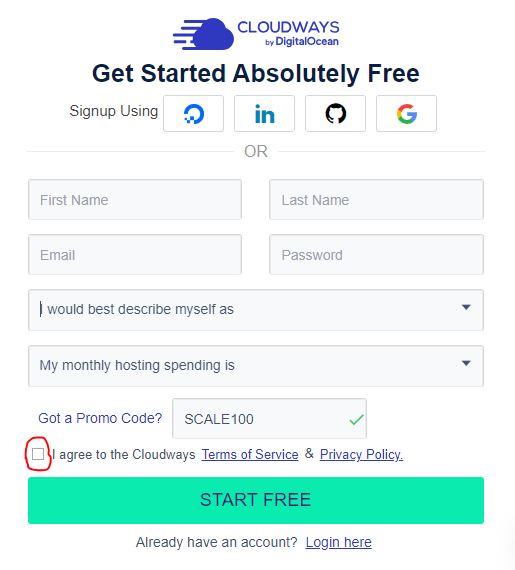
After clicking the free trial button. On the next page, need to verify your email to enter the verification code. Which you get into your email address. Just verify your code and visit the Cloudways dashboard.
There you need to deploy or launch a server to install WordPress. That’s why, click the server on the top menu and click the “+add server” button. Next, select the WordPress version, write your application name, server name, and create a project.

Next, select the Digitalocean server, and select server size. (I recommend a 1GB premium plan). select your near server location. Next, click the “Lunch now” button.
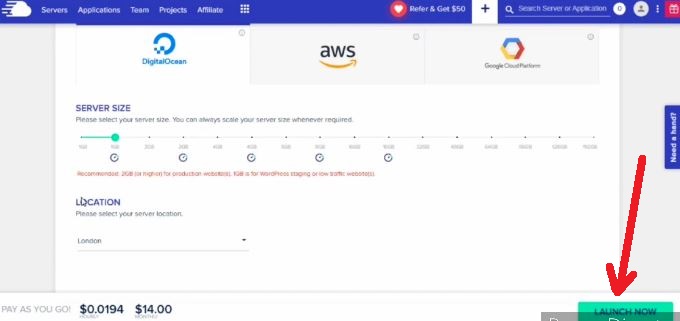
After clicking the launch button you need to wait a few minutes. Because it takes a few times to launch your server properly.

How to Install Application in Cloudways
After successfully launching your server, you need to install an application. If not installed automatically. That’s why click the application on the Cloudways hosting dashboard, and click the “add application” button.

On the next page, select your application, write your application name, and select your project. That means which project under you want to install the application. Click “Add application.”
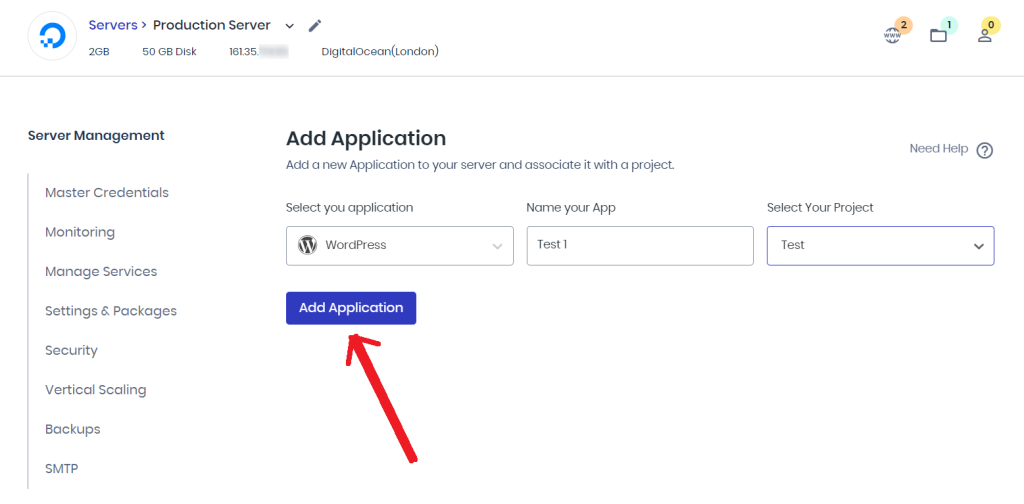
After successfully installing your application, you will get a notification. Like the below images.

Once the server and application launch are complete. Your next work is adding a custom domain, and installing an SSL certificate, for the complete wordpress creation process.
How to add your Domain in Cloudways
To complete the work, visit your Cloudways dashboard application option, and tab the application.
Next, you will be redirected to your ‘application management‘ page. Here you will see different management options. From there the “access details” option, copy your public IP address, and enter the IP in your domain DNS management at “A record“. Like the image below.
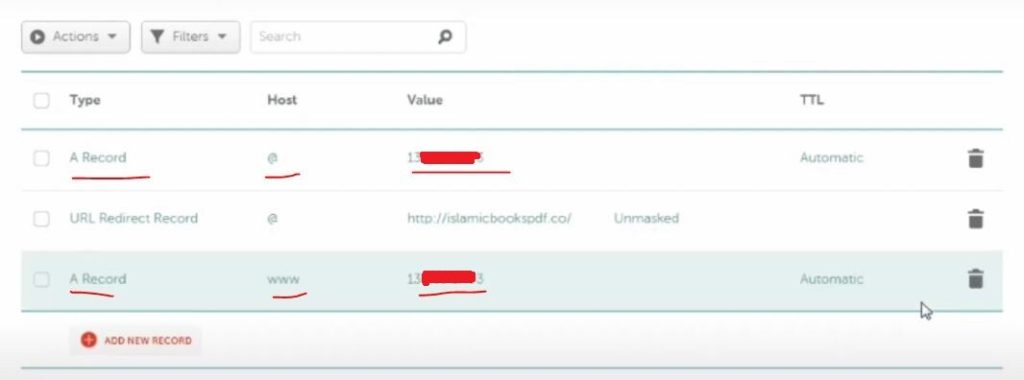
Next, copy the domain name and visit again your application management page. Click the “domain management”. Click the “add domain” button, enter your domain in the popup box and again click “add domain”. (If you don’t have a domain name then go to Namecheap, and buy a domain for your business.)
Next, click “three dot icons” on your domain side, and click “Make primary.“
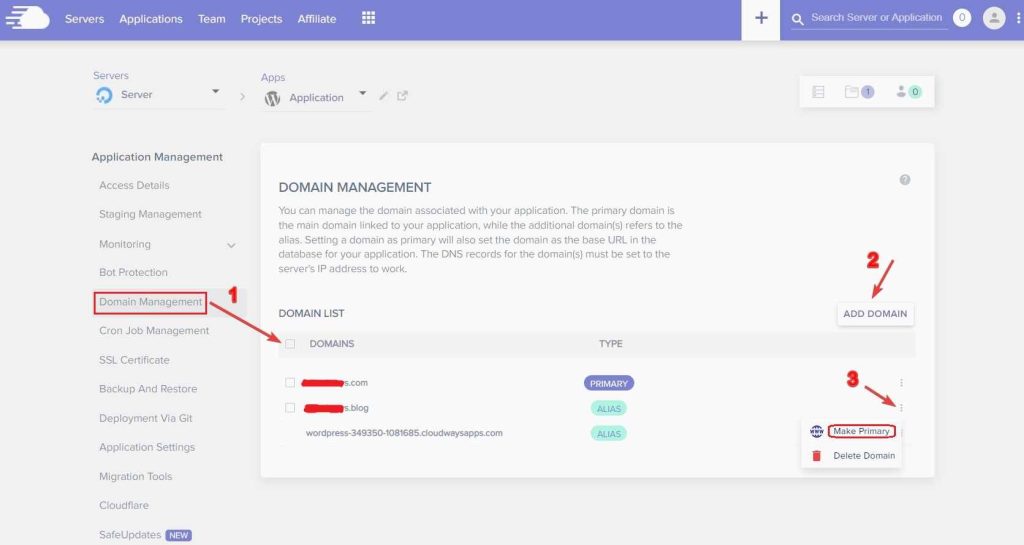
Successfully connecting your domain name with your application hosting server. You will see your website is live on the internet.
This time, open Google, and manually enter your domain name with the extension “wpmastar.com”. If your site is open then everything is okay. You just need to install an SSL certificate.
How to install SSL certificate in Cloudways
To install SSL certificates on your WordPress website. Go to your Cloudways application management page, and click the “SSL certificate” option.
Next, select your certificate types, enter your email id, and enter your domain name. Click the “install certificate” button.
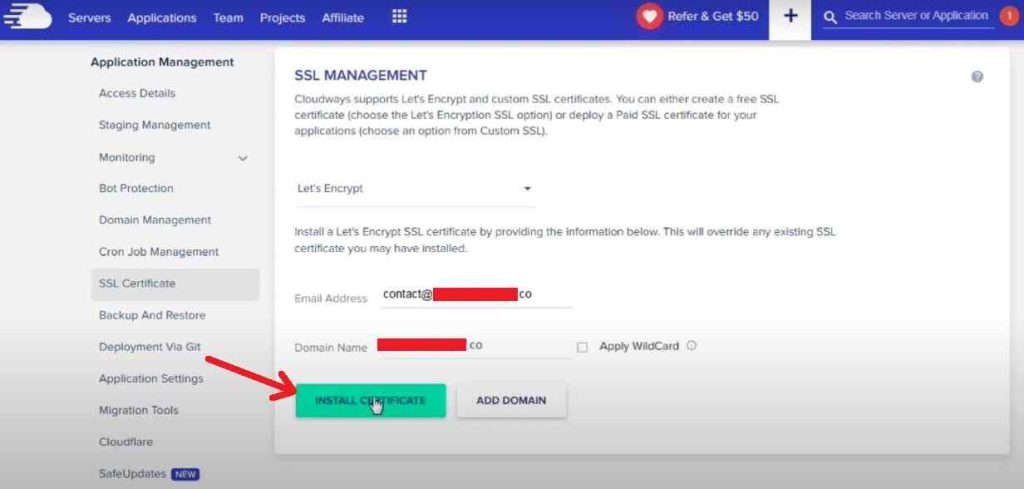
Once you click the “Install Certificate” button. It takes a few seconds to install SSL certificates in your application. This time you don’t back or exit the Cloudways domain management page. You just wait to complete it.
Once the SSL certificate installation is complete, you will get a notification. And then your next work is to add billing details for continuously using their hosting service. Because, if you do not add your billing details, then after 3 days maybe your account will be suspended.
How to Add Payment Details in Cloudways
For adding your payment or billing details. Go to your Cloudways dashboard, and click the “profile icon” on the top menu. And click the “account” option.

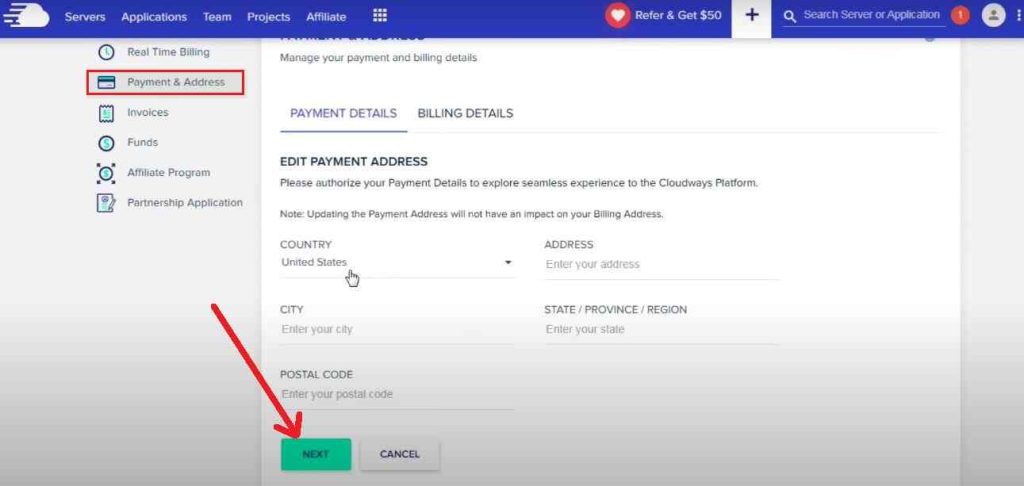
On the account management page, you will see multiple options. Here you click the “payment and address” option.
Next, click “Add to payments“. Select your country, and write your email address, city, state, and postal code. Click the “next” button.
On the next final page, enter your credit or debit card details. like; card number, expiry date, 3-digit CVV pin, and your name. Click the “AUTHORIZE” button, and verify your payment process to pay $1 only.
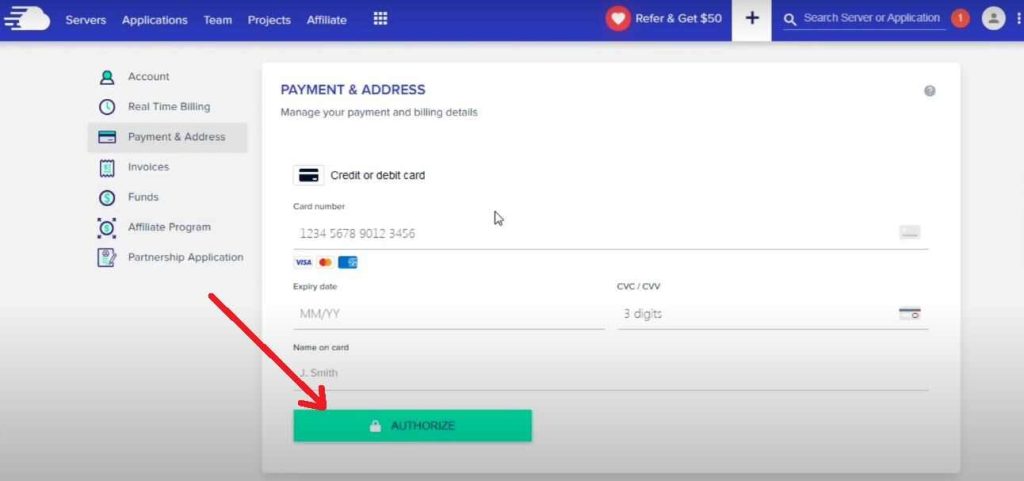
After your payment verification is complete. You will get your money refunded within 7 days. And you can enjoy up to 6 months of free Cloudways Digitalocean premium 1GB high-performance cloud hosting.
Free Astra Pro With Cloudways!
Sign up in Cloudways to use my special discount link, and get free Astra Pro with $100 free credits on Cloudways hosting.
Extra Tips :
To get the Cloudways hosting lifetime free. You need to copy your referral link and share it with your friends and family. Because, if any friends join Cloudways to use your link, you will get $50 free credit. That will be added to your hosting credit.
Final Word :
I hope you enjoyed reading the full article on installing WordPress in Cloudways cloud hosting step-by-step tips. If yes, and you like it, then share the post with your social media friends to help more people. If you have any questions, ask in the comment box below.
If you are interested in learning more about this topic, then subscribe to the website. Join the telegram channel, to get all new updates.


